More Electrical Gremlins

As you may have read from my previous posts, a historical rebuild / refurb of this car has introduced some electrical gremlins.

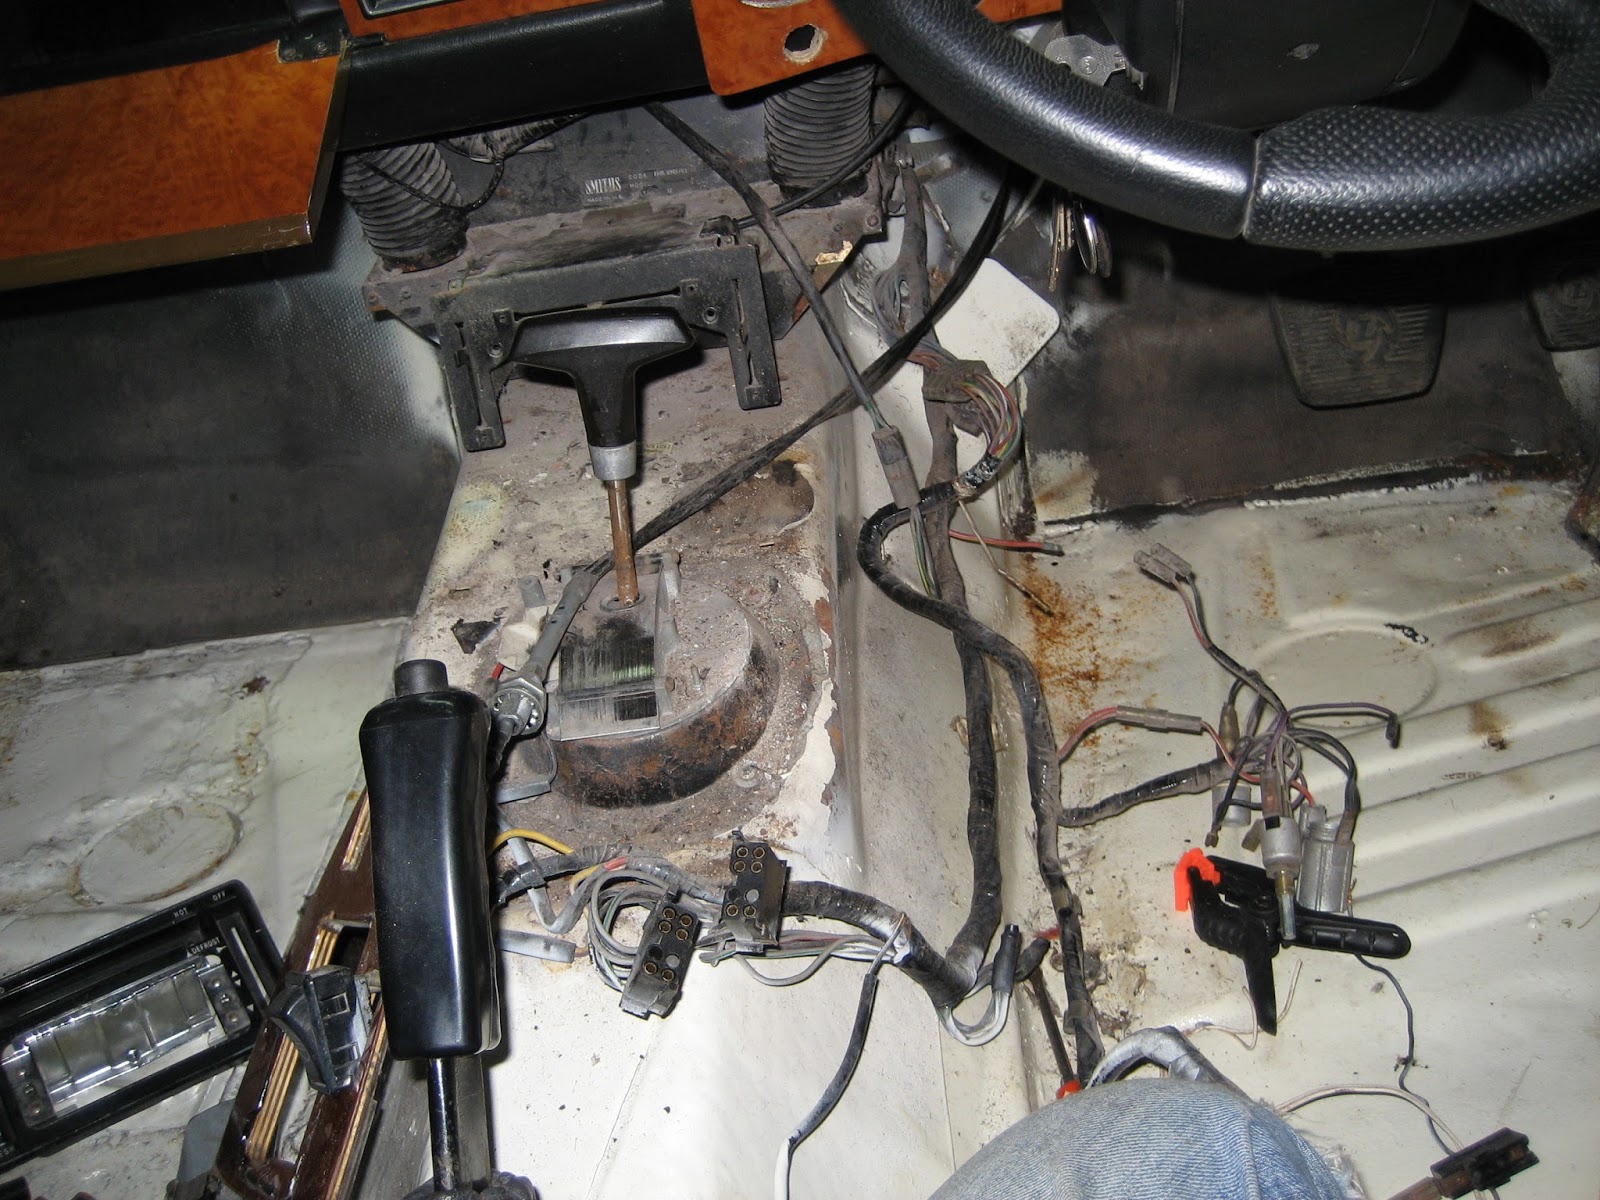
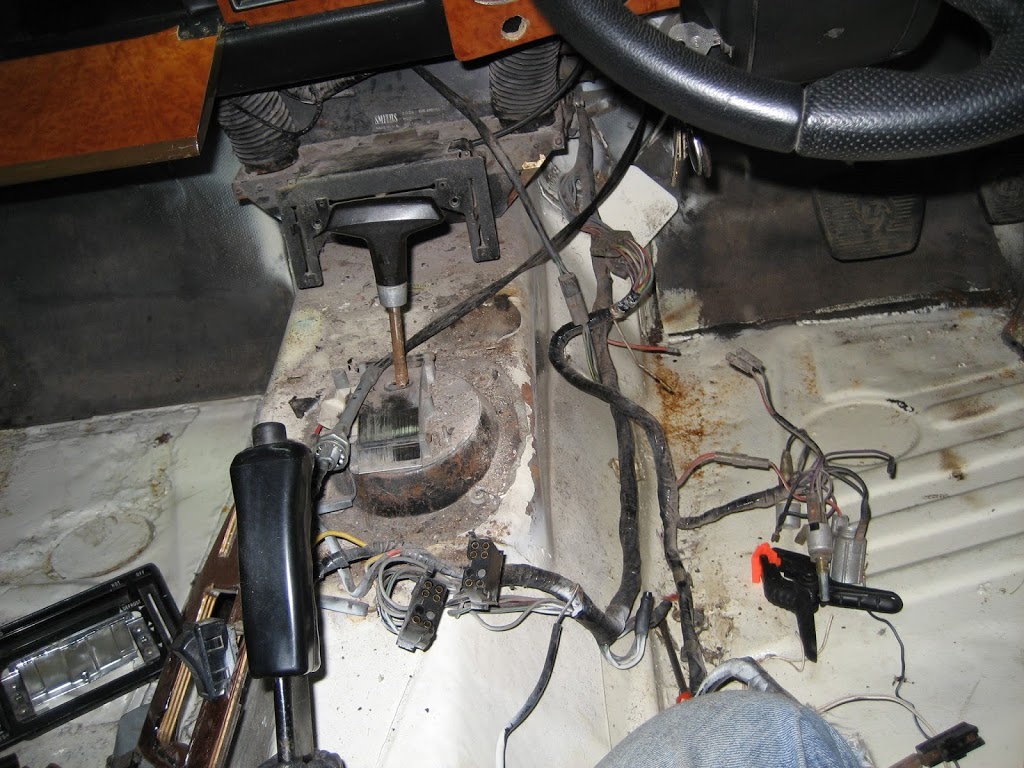
Whilst investigating why the battery totally discharged every few days I noticed that there was considerable spurious wiring hanging out of the dash for a) a radio which wasn’t fitted b) a rocker switch fixed to the centre console for something or other – unknown. There was also missing bulbs in the dash and issues with non functioning interior lighting, not to mention a random indicator that seems to make it’s own mind up whether it works or not.
So whilst I was waiting for some paint to dry I decided to investigate and remove the spurious wiring. 
Got a little carried away.
Now it’s all in bits I will put it back together with a little more care than the last time, check and test all of the wiring and replace with LED in the dash and interior – might even do the the indicators as well.
The more I look into the electricals the more I need to get down into the detail in order to figure it out. I am now doubting whether the basic wiring loom has been re-installed properly as there are so may wires that have simply been cut rather than the problem investigated and fixed
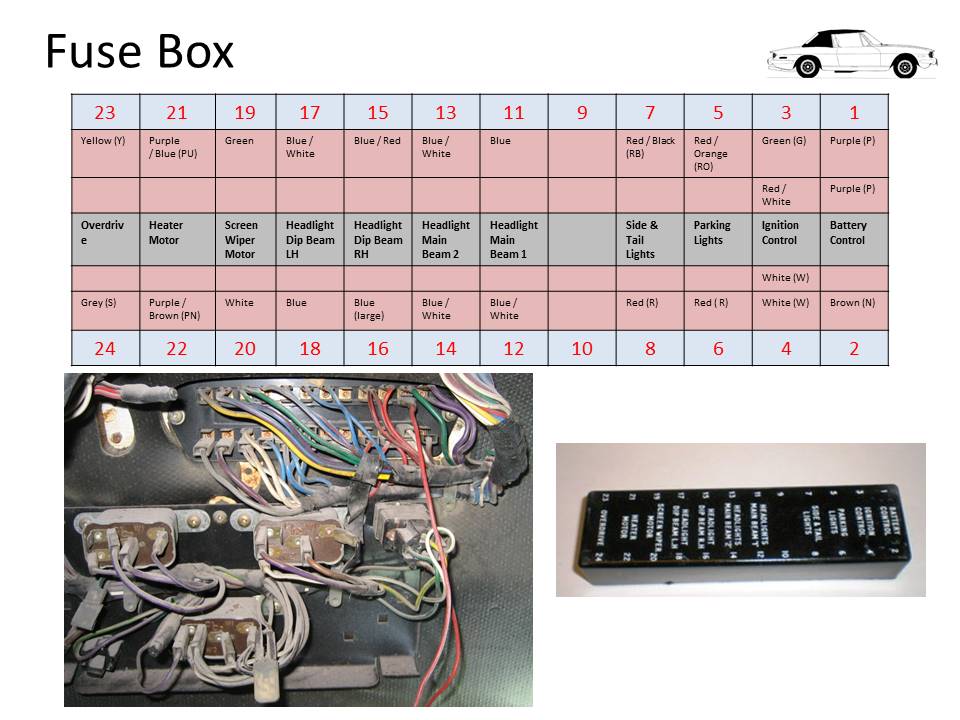
After some research on line and of course the expert knowledge of the Stag Owners Club I have come up with the following sources of information that should help me.

These are the starting points. As I work my way around the car and notice anomalies or modify/add new elements, I will make changes to these pictures and post on the Wiring and Electrical Diagrams page (here).
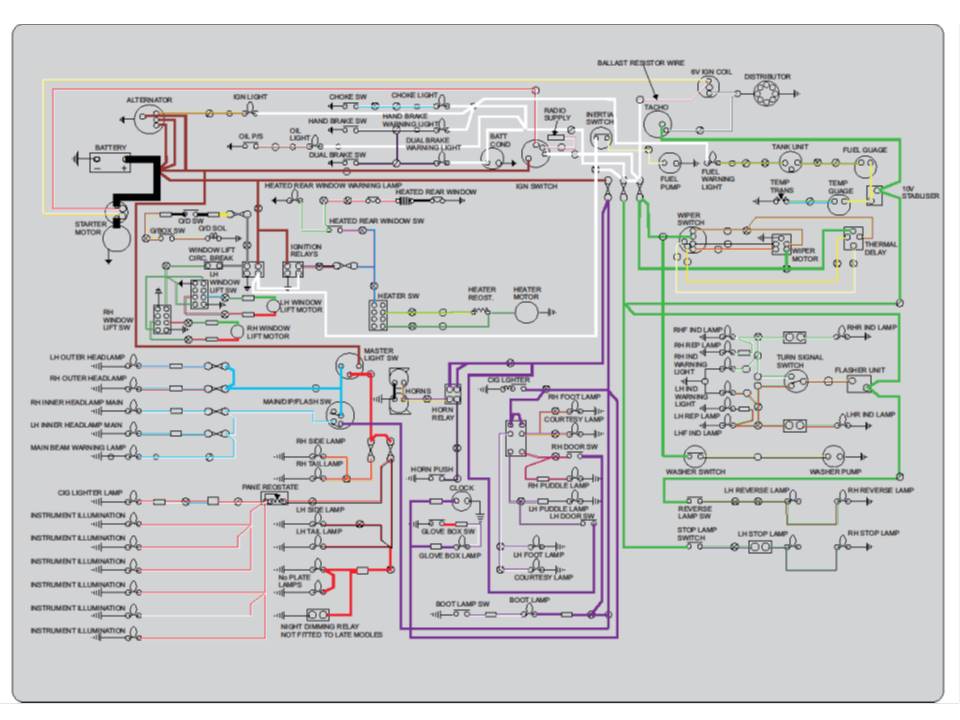
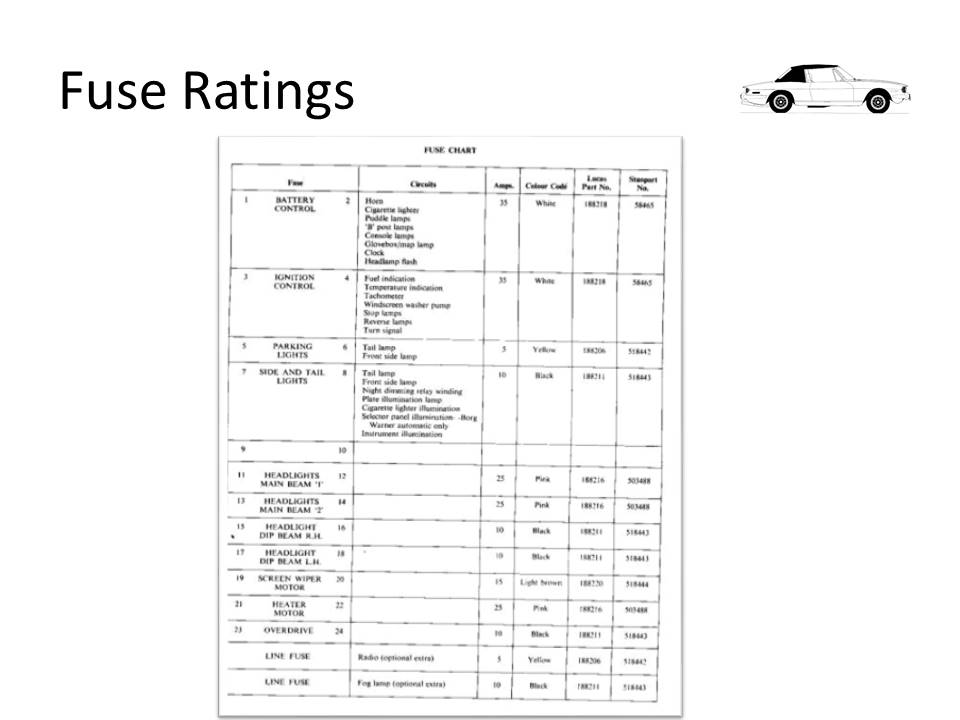
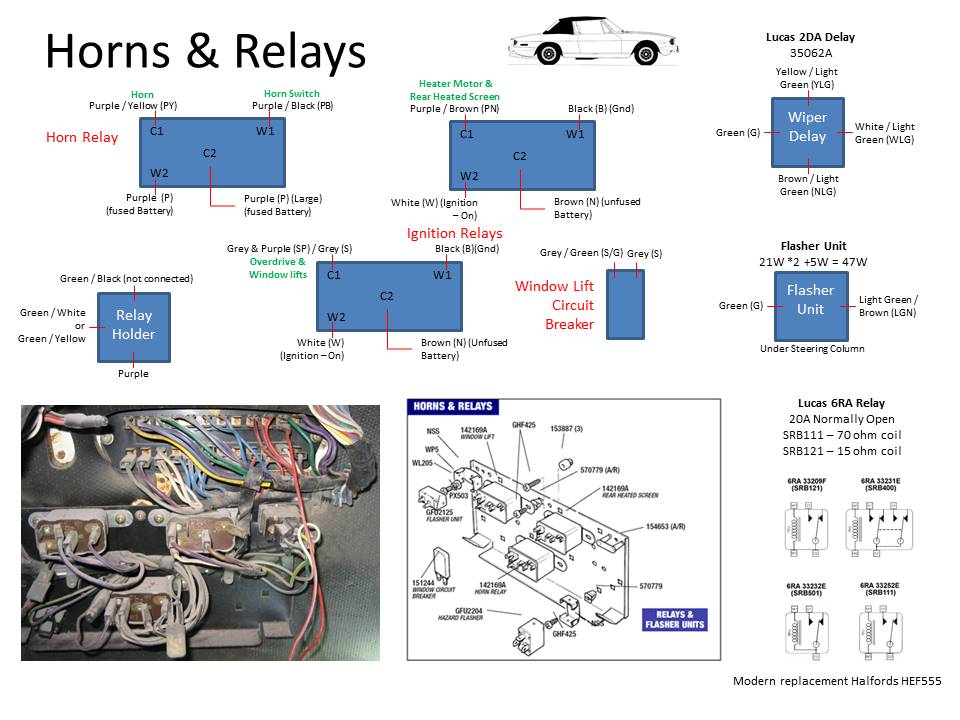
Wiring Diagram


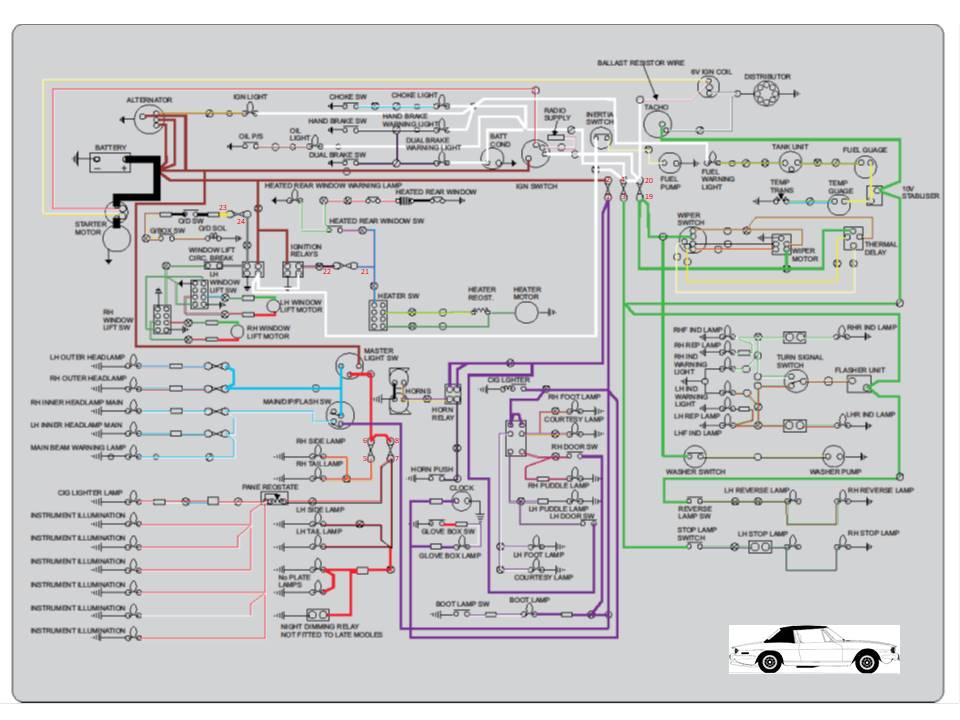
One strange phenomenon was the left hand indicator. It has always been, lets say weak, in that it sometimes worked and sometimes not. But recently the problem has worstened to the point where engaging the left hand indicator flashes the reversing lights. Looking at the circuit diagram above this seems impossible and I feared a new loom was called for. But, after talking to some helpful SOC members I eventually diagnosed the problem as the indicator earthing through the reversing lamps. Turns out that the earth for the indicator ignored a layer of paint between it and the chassis. Probably not there when the car was disassembled before it’s respray, but definitely present afterwards and not removed to provide a good clean earth.

Front Seat Refurbishment

43 years have taken their toll on the padding of the front seats. Whilst the structure/frame was sturdy and robust, the bolsters were non-existent and had collapsed. There was also evidence of rust to the rails and the seat frame. So, new fillers were purchased from Mr Rimmer and I started to open up the first seat to see what was inside……
As there are no issues (other than dirt) with the vinyl covering, I carefully removed each of the many retaining clips that hold the fabric to the frame. What I found in there was disgusting. The foam had completely disintegrated in the bolsters and stank!!
With the aid of rubber gloves and a razor blade, I parted the vinyl from the padding. Not easy, as the padding had been glued to the vinyl and was still firmly attached even after all of this time. It was also complicated by the need to disassemble the seat frames in order to remove the vinyl in a way that it could be re-used. 
I ended up with 3 pieces of frame: the runners, the seat base and the seat back. Each needed extensive cleaning and removal of surface rust before prepping and painting with black Hammerite.
Here is the seat back after painting and with the rubber strapping cleaned and replaced. Looks better already. 
Putting the new cushions back in place took longer than I had thought. It’s not a difficult process if you reverse the dismantling process, but it’s fiddly and made far more difficult for re-using the seat vinyl. The reason is that the seat vinyl is secured to the frame by beige strips of much less heavy duty vinyl – see photos.This can rip, especially when you start to tension the vinyl over the new cushions.I was quite pleased with the result though.The seat base is a single cushion so should be more straight forward, but oops I don’t have them. After checking my order from Rimmers I found I didn’t order properly. I only ordered the kit for the seat backs rather than the complete seat. So I received the 2 side bolsters, 2 seat back cushions and a cushion connecting the 2 bolsters that sits under the head rest – but no set base. Another order from Rimmers required.
The drivers seat was much like the passenger one: the cushions had collapsed with age and usage, the frame and runners had rusted, and the whole thing was just tired. Unlike the passenger seat the seat base on the drivers seat did have a couple of nicks /splits in the vinyl. I didn’t think they were sufficient to warrant the expense of a new vinyl (I’ve spent enough with Mr Rimmer lately) so I have patched it from the back with strong tape. 
Here’s the end result – much improved.


Alternator Problems

It’s been a few weeks since I have had any time to work on the Stag. It’s been a very busy time at work – the culmination of 2 years work successfully delivered at the end of June 17. So now it’s time to take a breath and get back into the garage.
The last few weeks have benefited from some very warm, dry weather – perfect for the old Stag. I have had the Stag on the road a few times with the hood down listening to that intoxicating burble. But, every time I get into the car after it has stood for a few days, the battery is flat. As there is now radio or clock at the moment, then this is a little puzzling. Once started the, voltage reading climbs up to 16.5v (as I would expect if the battery was very low) but it stays there and doesn’t drop back as I would expect after 20-30 miles. Dropped a quick query on the SOC Forum and the consensus is that the alternator needs replacing. The built in regulator is probably not functioning. 
The direct replacement is the 18 ACR. Some upgrade to higher ampage, but I intend to replace the lamps all round with LED so I don’t feel the need for more amps at the moment, as LED will reduce the overall load. So, courtesy of the interweb and RimmerBros a new 18 ACR arrived. Fitting from above was fairly straight forward. Moved the screen wash bottle out of the way. Disconnected the power steering pump brackets and swung the pump around to where the screen wash bottle once sat. Then slackened the 3 bolts that hold the alternator in place. Then the problem – and there always is one. The old alternator has 4 terminals and the new one only 3.

Looking at the Stag wiring diagram, the extra thin brown terminal doesn’t seem to be needed. It looks like it connects to the same general, pre-ignition switch live as the other 2 larger Browns. Checked with the SOC Forum just to be sure. The advice is to isolate it and just use the single large connector. So, put it all back together and hay-presto the alternator now responds to the level of charge in the battery – success.


A week later – battery flat again. Perhaps the over-charging old alternator had destroyed the battery? I’ve no idea how old the battery is. I’ve probably fried it. So, down to Halfords to pick up a HCB072 calcium battery. Maybe this would fix it. Well it did for a week or so. Then the same problem – flat battery after a few days.

Putting an ammeter in series with the battery positive lead showed 2.5A without the key even in the ignition!! Something seriously wrong here.

So back to the wiring diagram. By following each of the paths from the battery positive, I found that the current was leaking through the Ignition Warning lamp via the alternator to ground. The internal resistance of the alternator circuitry was luckily preventing a dead-short and the flames that usually go with this. So why was this happening? Another painstaking but systematic tracing of wires followed. As always, when I found the problem it was easily explainable. The 2 thin wires from the alternator (one brown and one brown/yellow) exited the alternator, into the loom, then popped out of the loom further along the engine component into 2 bullet terminals and a double connector. The wires had been reversed into the connector: brown to brown/yellow and vice versa.
I’ve replaced the connector with new individual bullet connections which I have heat shrunk. An easy mistake to make. The brown and brown/yellow look very similar especially when covered in the gunk from the engine bay, but the problems it has probably caused go further than the ones I have found so far. There is evidence of fiddling with the console warning cluster and internal lighting. But those are problems for another day.