GBS kindly sent the missing spacers and bolts via first class post. 36 hours later they turned up 🙁 Not GBS to blame, but our postal service which seems to be in steep decline….. but enough of that.

With the spacers and bolts supplied I bolted the engine mounts to the engine block and lowered the engine so that it just rested on the chassis but carried no weight. I had already mated the engine and gearbox and bolted them together once more.
The final step is to centre the engine in the chassis by marking the mid-point on a chassis cross member and aligning it with the centre of the nut on the flywheel. The position of the holes on the chassis plates for the engine mounting brackets was then marked and drilled to 8mm.
I found that one of the off-side bolts would have been too close to the chassis to get a nut on underneath so I drilled a new hole in the bracket and used that instead. My logic being that the slight weakening of the plate by drilling another hole was much less of an issue than leaving one bolt off altogether.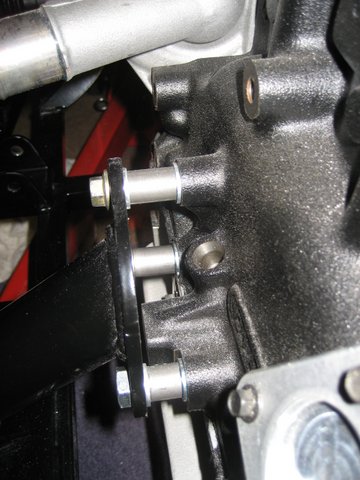 As the engine can be hoisted vertically using this method of installation it was simple to move it out of the way to drill the plates.
  With the chassis plates drilled, it was now time to finally fit the engine and gearbox and torque up the bolts on the gearbox mount, prop shaft, gearbox casing and engine mounts (see Torque Settings). Finally with the side panels still off I fitted the started motor. Not the simple 5 minute job I thought. The top bolt is too close to the gearbox housing to tighten properly. After a few minutes filing down the rim of the nut head, it went in.

Automotive Projects Blog