
Job 1: Exhaust
 As you will have seen in previous posts, (and heard if you were on the GBS Run-Out) my exhaust was rattling again – badly. I had already attempted a fix according to instructions from Richard@GBS which had temporarily quietened it, but it had returned.
Richard@GBS agreed to take the unit apart and fix it properly in the factory. All I needed to do was get it to him. What could be simpler? Unbolt the silencer box and take it to the factory.
TIP FOR NEW BUILDERS: Cut the manifold pipe such that the silencer box can be slipped on and off without having to remove the exhaust bracket at the back or the manifold itself at the front.
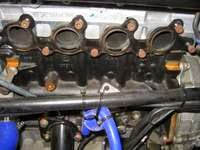
Of course, I didn’t think of this at the time, so the manifold had to come off in order to remove the silencer box. See picture above – a little soot after 3000 miles, but all the fixing bolts came out easily. I had feared that the heat would have caused at least one to cease solid.
Richard@GBS was true to his word and reduced the tolerance between the inner and outer pipes that make up the silencer box internals. They are now much, much tighter and as a result the rattle has gone. I also took the opportunity to check the wadding in the silencer box once it was open at the factory. No problems at all. Still in place, and still filling the volume. There are tales of the wading deteriorating, but I saw no sign of this in my box.
Job 2: Gear Stick Linkage
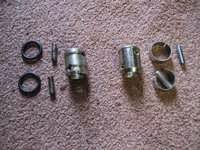 There have been many accounts this summer of failure of the linkage between the base of the gear stick and the gear box selector shaft. In the photo on the left you can see the original cylindrical linkage (on the left). It has two pins that make the respective mechanical connections with the selector shaft and gear stick. Each are held in place with rubber washers – also shown.
 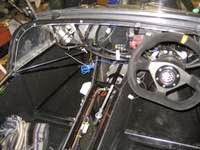 The rubber washers are prone to perish. When one fails, the pin drops out and the gear stick becomes no longer attached to the gear selector and you are stuck in whatever gear was last selected.
There is a new design of linkage – see the one on the right in the photo. In place of the rubber washers, the pins are kept in place by spring steel clips. Much more secure.
Replacing the linkage is far far easier with the car on stands, rather than in the road in a layby, but still quite an involved process as access from above requires removal of the dash, centre console and Auxiliary panels. Even with these all removed my big hands had difficulty.
Job 3: Rattling Gear Stick
 Not a problem as such, more an annoyance. When driving I find that my gear stick rattles. So while I had it all in bits I made some washers from some spare piping. Simple but effective – no more rattle – peace at last.
Job 4: Rear Disks and Brake Bleeding
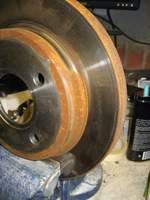 I do find surface rust ugly. Recently I have noticed it on the rear brake disks which are visible through the spokes of the rear wheels. A simple coat of hammerite should be sufficient to smarten this up, taking care not to cover the braking surface obviously. Whilst I am doing this, it would also be good practice to replace the brake fluid and bleed the brakes once more, as the fluid has been in-situ for over 18 months now.
The brake disks came up fine with some 1200 grit wet’n’dry and a coat of black hammerite. I now don’t notice the surface rust through the wheel spokes. Probably only me that noticed.
Replacing the brake fluid and bleeding the brakes is not a big job at the front as there is plenty of access to the bleed nipples on the front callipers. The rear on the other hand are more tricky. The rear callipers are mounted upside down. This means air can collect inside the calliper and no amount of bleeding will shift it. The calliper has to be inverted before bleeding if you want to shift this air. The near side gave up without too much of a fight, but the offside decided not to play. 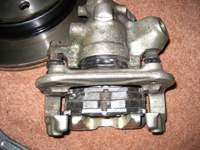 Firstly the bleed nipple refused to open despite numerous attempts to free it using penetrating oil. The use of force then had predictable results in that I rounded of the brass nut. So the whole thing had to come off so I could replace the nipple. In the process of doing this the calliper piston closed slightly so that I couldn’t refit it over the brake disk once the pads were in place.
If you know how the internals of the Sierra rear calliper work then this is not a problem. If, like me, you don’t, then this is a show stopper.
It turns out that the piston has a ratchet mechanism to aid the hand-brake. As the pads wear the piston rotates slightly and in doing so closes the gap between itself and the first brake pad. It then latches into position so the gap remains closed. Great in order to keep your hand brake effective, but not good if it closes too much to get the calliper and pads re-assembled over the brake disk. To fix this you need to wind the piston back into the calliper. It can’t be forced with a hammer or clamp. So it has to come off and onto the bench again.
Job 5: Pressure Cap and Water System
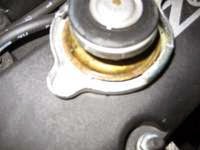
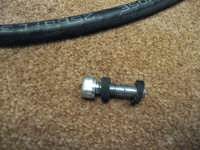
 You can see the evidence in the picture on the left. The thermostat housing is covered in the residue left when water and anti-freeze leak from the pressure cap and evaporate on the hot housing. The picture on the right is my original pressure cap. As you can see it seals to the thermostat housing using a metal plate, or at least it almost seals. The “almost” causes the leaking and the overflow tank and overflow process not to work properly. Fluid is not returned to the main system from the overflow as the suction is lost. In practise you need to keep topping up the water level.
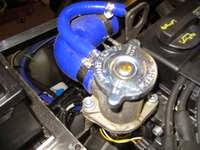 To fix this I simply bought a new pressure cap from GBS with a rubberised seal. This seems to work much better, and after a couple of tests to full temperature I can’t see any leaking fluid and the water level hasn’t dropped.
Job 6: Crankcase Breather
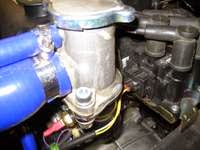
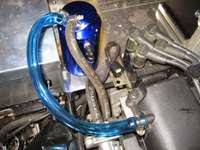 When I put the engine under some duress on the track (or road) it has been known to result in hot oil being ejected via the crankcase breather. This has two effects a) oil all over the engine bay; b) the smell of hot oil whilst you are driving. This latter effect became so strong that after one event I could taste the oil. So, I have invested in a small catch tank to see if that helps.
  Reading around the possible installation configurations, most would suggest that you feed the output from the catch tank back into the engines air stream for re combustion. As I had a spare input into the plenum I started by connecting the output to the plenum input. Unfortunately the engine ran very lumpy on tick-over and eventually stalled. I suspect this will have been something to do with the high vacuum pressure the plenum generates. So, my second attempt has the output venting via a filter back to atmosphere. I haven’t tried it under vigorous driving conditions yet. I hope it helps. Nothing worst than beer tasting of oil.
Job 7: Side Mirrors
A very quick job this one. The reverse of the side mirrors had taken some wear and tear from chippings and insects etc. This had caused the coating the flake and some rust to form. Another case for the 1200 grit wet’n’dry and black hammerite. They look fine now.
Job 8: Headlight Upgrade
I haven’t done this job yet. I am thinking of upgrading the standard H4 halogens. Do I go HID Xenon or replace the H4 bulbs with better quality, higher output units? I’m still deciding.
21st Feb 2015 Update
Decided on H4 bulb upgrade to Xenon Ultima (Ring Automotive) over twice as bright but at reasonable cost from Amazon.
In order to replace them however, I did need to replace the retaining bolt that clamps the chrome ring around my free standing 7″ headlights. The phillips head had corroded and I couldn’t get good purchase on the nut as it was non-standard and difficult to reach. In the end I ground off with my Dremmel and replaced with 35mm M3 Cap head and nylon lock nut.
Good set of jobs ! Some are on my list for January ? And Hammerite will be used as well ? Just a quick note on Job No.8, I just replaced my bulbs with the "Whiter" type H4 still 55/60w and a marked difference from the standard bulbs, from Ebay at the time £5.99 a pair. just put into search… 2 x XENON MEGA WHITE H4 12V SUPER BRIGHT HEADLIGHT BULB. worth a try at that price ?
Thanks Bill – as you say worth a try for £6 – may not need a £40 HID kit which will hardly ever be used.